Friday, December 31, 2010

It's Party Time!! (Baked Buffalo Wings!)

We're all getting ready over here for a night of partying. Of course, one of the main components of any party I am going to attend is: FOOD. In order to not overwhelm the hostess each guest has volunteered to bring a dish that can please the masses. Our contribution this year? Bob's Baked Buffalo Wings.

About a year into our marriage I asked my husband to list all of the foods he would really like to be eating that I had not been cooking for him. He responded, "All the things I want are bad for me, so I don't think you want to hear them..." I assured him that I wanted to hear of all of his wishes and desires so that I could make him happy and look for a way to make his greatest food loves a part of his long, healthy life. One of his great loves was, of course, Buffalo wings, however, he had only been exposed to deep-fried, greasy mini heart attacks covered in a spicy sauce. I decided there must be another way and set off to finding it! What I have found has become my husband's favorite wings, which is why I call them Bob's Baked Buffalo Wings! The wings are delicious and, I think, a much healthier option for wing lovers than the typical fried wings.

Bob's Baked Buffalo Wings
Yummy!!

Ingredients

    • 1 lb chicken wings
    • 1 tablespoon cayenne pepper
    • 1 teaspoon crushed red pepper flakes
    • 1 tablespoon salt
    • 1/2 cup Frank's Red hot sauce
    • 1 tablespoon Earth's Balance buttery spread (you can use butter or margarine if you are so inclined)

Directions

1. Fill a large pot half way with water. (Make sure you have a lid for this pot!)
    2. Add the first 4 ingredients.
      Important note about McCormick's spices: They do not add gluten to their single ingredient spices (Read here for more information about their gluten and allergen policies.)
      3. Bring water mixture and wings to a boil and then boil for 15 minutes. (During this time you may want to get out of Dodge! Put the lid on the pot, if you can without it overflowing, because the steam this mixture kicks up can be quite powerful!!)
      **An interesting, and accidental, discovery: if you want some KNOCK-YOUR-SOCKS -OFF fiery-hot wings, extend this boiling time (I did this once while my husband went out to the store so the wings would be fresh out of the oven when he came home and we were teared-up, hysterical laughing, and talking about the wings for weeks!)**
      4. Put the wings on a sprayed cookie sheet, or some other oven-safe dish. Make sure the wings are not on top of one another. 
       
      5. Bake wings on "Broil" (high) for 15-20 minutes on each side. (The longer you keep them in, the crispier they get, but watch them as you get close to the 20 minute mark, or longer, so that they don't burn. 
       
      6. While the wings are in the oven, get a sauce pan on the stove top  to combine the Hot Sauce and buttery spread over a medium heat. Stir continuously until butter melts and is evenly mixed. (The longer you cook the sauce, the thicker the sauce). 
      **Also, if you wish to play with the sauce's hotness scale, simply play with the "butter" to hot sauce proportions. More "butter" = milder; more sauce = hotter.**
      I swear by that Frank's Red Hot Sauce!! (But you can use your own favorite hot sauce if you like.)
    7. The last step is the most fun!! Find a container that you can safely put wings and sauce in to shake up. If you have to do it in batches, so be it, but have fun shaking what your Mama gave ya!
    My Lock & Lock container is perfect for this job!!

    This batch is ready to go! We're ready to party! My husband is out foraging for bleu cheese for the dairy eaters that are sure to be at the party tonight and I am off to chop some celery sticks.
    I wish I could just give one to you right now!!

    I wish everyone a wonderful, healthy, happy and delicious New Year!
          

      Thursday, December 30, 2010

      Quinoa: The Mother Grain

      See more info at EcoLibrary
      Quinoa, pronounced KEEN-WA, has been on my radar for quite some time. It is an ancient grain-like food from the Incas, prized for its ability to increase the stamina of their people. Although quinoa is often thought of as a grain, it is actually a green leafy plant like spinach or chard. What has become popular, commercially, is the seed of the quinoa plant, even though the full grown plant can also be consumed.


      Quinoa Is Awesome

      The quinoa seed is an excellent source of iron, calcium, magnesium and fiber. It has served as a gluten-free grain. It is simple enough to prepare and getting easier, by the day, to find in mainstream stores. However, possibly most importantly, the quinoa seed is one of the very few complete proteins available to us. This means that the seed contains the correct balance of the 9 essential amino acids the human body thrives on.

      Learning all of this in my quest for a diverse menu of healthy meals to choose from, I began exploring quinoa as a possible addition about a year ago. At first, I had great difficulty finding it outside of health food stores or shopping online. Then my own grocery store began to shelve it and now they even have red and black quinoa as well. Since it has become easy enough to acquire that I can now. realistically, include it in our weekly meals, I have started exploring some ways to prepare it.

      I had practiced the basic preparation of quinoa, adding various ingredients, preparing it much like a rice dish as a side to my dinners, or creating warm quinoa dishes for a quickie lunch. During November, I discovered a great recipe for a breakfast quinoa dish - a hot apple cinnamon quinoa cereal that was absolutely delicious. However, regardless of the preparation, my husband still was uncomfortable with the texture of the dish. I had all but given up on sharing quinoa with him when I found out about a technique I had not yet tried: Toasting the quinoa.

      Toasted Quinoa

      Toasting quinoa is not a recipe unto itself, it is a preparation of the seed that gives it a rich flavor and does, in fact, change the texture as well. The technique is simple, all you require is:
      • rinsed quinoa seed
      • a pan
      Put the rinsed quinoa into your pan on medium heat. Either shake the pan or stir the quinoa continuouslyfor 15 minutes. The quinoa should turn a golden brown color.
      The smell of the toasting quinoa was similar to that of popcorn.
      When the toasting is complete, take the pan off the heat and allow the quinoa to cool. This quinoa can now be stored in an air-tight container for up to one month and used in any recipe you would use regular quinoa for.

      Quinoa Pilaf (Now Toasted)

      I am happy to say that my first experiment with this "new" quinoa was a wonderful success. I prepared a simple quinoa pilaf from the back of the box of quinoa I purchased (Ancient Harvest Quinoa) and my husband actually liked it! He noted the difference in the texture and thinks toasted quinoa may be the secret he has been waiting for. My cousin, who has been staying with us for the holidays, also tried the pilaf and enjoyed it as well. It was her first ever experience with quinoa and she called home to Miami to tell her fiancee about it. Needless to say, toasted quinoa will be a mainstay in our house and for that reason I really wanted to share it with you as well!

      Here is the recipe for the pilaf, if you are interested in giving it a go as well:
      (*Note: This made A LOT of quinoa pilaf! You may want to adjust the recipe before diving in with all 6 cups of your quinoa!!)

      Ingredients

      • 1/2 cup Diced Carrots
      • 1/2 cup Onions, Green
      • 1/4 cup Celery, raw, diced
      • 1/4 cup Diced Green Peppers
      • 1/4 cup Red Peppers
      • 6 cups Ancient Harvest Quinoa
      • 1/4 cup Olive Oil
      • 2 clove Garlic
      • 1 cup Almonds, Sliced
      • 1/4 tsp Oregano

      Directions

      Sauté chopped vegetables in olive oil until clear, yet crisp: stir in oregano. Add sautéed vegetables to cooked, hot quinoa, mixing well. Add salt to taste. Dry-roast almonds in heavy skillet until lightly golden. Add almonds and mix. Serves 6-8. Quinoa pilaf served as a side dish with fish or chicken is delicious. Vary the pilaf using your favorite vegetables, or by cooking the quinoa in chicken, fish or vegetable stock instead of water.


      Question for Commenters: 
      What are your great recipes/uses for quinoa? Now that I finally have my husband back on board, I am ready to experiment!! 


      Tuesday, December 28, 2010

      My Unintentional Blog-Vacation

      The holidays came! I thought I would easily blog my way through them, but I was very, very wrong! There was just way too much going on!
      Grown-ups playing with puppets.

      Dogs destroying 5 minute old Christmas gifts.

      Babies loving old buttons MORE than all the shiny new toys under the tree.
      Babies wondering why aunts won't just hand over the cracker instead of toying with her just to get a picture!!
      A bunch of grown people trying to be Micheal Jackson, thanks to the Wii.
      A serious couple's battle for MJ dancing bragging rights.

      Cousins practicing their Wii bowling techniques.

      "Little" brothers falling asleep in ridiculous positions on an ottoman at 4 in the morning.
      And then...
      Snow!
      20.5" of snow, plus wind and cold.
      It is still out there...
      and I was out there with it,
      but I am back!

      The blog-vacation is over. Next year I will have to prepare better for this time of year!!

      Monday, December 20, 2010

      My Gluten-Free, Dairy-free Baking Helpers

      One of the things I have always loved doing during the holidays is baking. Whether it is for my own guests, or to bring to a party as a shared yummy treat for everyone to enjoy, it is the one thing over the past couple of years I have felt confident in contributing. Since going gluten-free AND dairy-free, I truly thought this was one holiday tradition I was going to have to replace. The whole idea of finding a replacement flour combination that could stand in for my typical All-Purpose Flour AND finding suitable replacements for the milk and butter in all of my baking adventures seemed utterly impossible! I had decided that I should resign myself to a life of pre-packaged gluten-free/dairy-free baked goods, since this "new" type of baking seemed largely out of my depth.

      Then, one day, while shopping around in my Stop N Shop, my eyes fell upon some packages from Cherrybrook Kitchen. I can't be blamed - their boxes are simply adorable! I grabbed a a box of brownie mix, a box of sugar cookie mix and a yellow cake mix with chocolate icing. I thought, Maybe I can't bake from scratch, but at least I can have something freshly baked! To be honest, the mixes hung out in my cabinet for a while, because there was still something mising from grand plans: WHAT SHOULD I USE FOR BUTTER?

      Enter Earth Balance buttery spread and buttery sticks. I kept scouring the Internet for dairy-free butter substitute suggestions, and Earth Balance was the one that came back with the best reviews. I decided to give it a go. I bought it right before Thanksgiving to use for myself and I was pleased with its taste AND texture. I began to think I might really be on to something...

      So far I have made both the brownies and the sugar cookies. They were both a great success! Whenever milk was needed I used (my favorite) the Pacific Hazelnut milk. I made the brownies for just my husband and I, at first sure that gluten and dairy eaters would have no interest and then sure I didn't want to share any because they were so delicious! I brought the sugar cookies to a Holiday party this weekend and everyone cheered them on (my husband thinks it is the addition of the hazelnut milk that puts them over the top... I think he might be right).

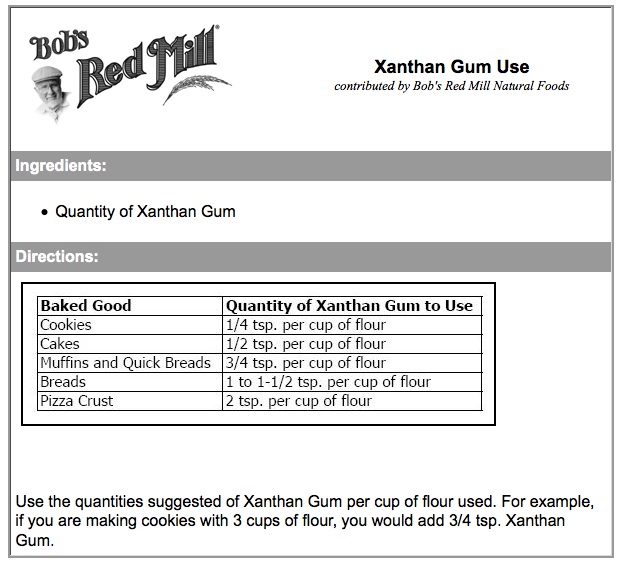
      With two pre-made mix baking successes under my belt, I decided that maybe, just maybe baking from scratch might not be too difficult, IF I could find the right gluten-free ally to aid me in my endeavor. I thought of one company that I already trusted to get me the ingredients I needed: Bob's Red Mill. Bob's Red Mill doesn't just carry gluten-free stuff, but their selection of gluten-free mixes, flours and other baking supplies is like no other that have been readily available to me. I purchased the Gluten-free All purpose flour a little while ago thinking I could use it in any recipes that called for flour, last night, however, I decided to see what they had on their website in terms of baked goods recipes. The selection was amazing! When I got to the site I was in awe of all they had to offer in terms of recipes, information and also other products that I haven't even seen in my store yet. (I informed my husband that a Bob's Red Mill gift card wouldn't be a bad idea for a last minute Christmas gift for me after this find!) One of the most useful bits of information for me was the Xanthan Gum Use Chart given on the site:
      The xanthan gum is very important to the process. It is my understanding that it serves as a stand-in for gluten providing much of the texture we rely on gluten for in recipes.

      I searched for a recipe to use for another holiday party we will be going to tomorrow. I settled on the Gluten-free Oatmeal cookies since I had all of the necessary ingredients on hand (as long as I replaced the raisins with chocolate chips). I just finished baking them and I nearly made myself sick (I was under the impression that I had to try at least one cookie from each freshly baked tray that came out of the oven!!). Here is the recipe, from Bob's Red Mill, as I adjusted it:
      Just a couple from the batch.
      Gluten-free Oatmeal Chocolate Chip Cookies
      Ingredients
      • 1-1/2 cups Gluten Free All Purpose Baking Flour 
      • 3 cups Gluten Free Rolled Oats 
      • 1 cup Earth Balance Buttery sticks
      • 1 cup Brown Sugar 
      • 1/2 cup Granulated Sugar 
      • 1 tsp Vanilla 
      • 1 tsp Baking Soda 
      • 1/2 tsp Sea Salt 
      • 1 tsp Cinnamon 
      • 2 large Eggs* 
      • 1 tsp Xanthan Gum 
      • 1 cup Semi-sweet Chocolate chips (**Contains some dairy... I will regret this later!)
      Directions
      Preheat oven to 350°F. Beat butter and sugars together until smooth. Add vanilla and eggs; beat well. In a separate bowl, blend flour, cinnamon, baking soda, salt and Xanthan Gum. Stir flour blend into wet ingredients. Add oats and raisins and mix well. Drop rounded tablespoons of dough onto un-greased cookie sheet. Bake for 10 – 12 minutes, or until golden brown. Cool one minutes then transfer to wire rack. Makes about 4 dozen cookies.

      I hope the gluten and dairy eaters enjoy the cookies, because now I have a ton of them and I can't eat them all myself!

      I am happy to have had this success with the new products I have found. I now feel brave to move forward and try to switch some of my old favorites over to gluten-free, dairy-free goodies I can enjoy!

      My Allies in the Baking Battle:
       

      Total Pageviews

      Usability Testing / userfly.com

      usability studies by userfly

      Action Alerts RSS Feed | Food & Water Watch